
Showing posts with label Planning. Show all posts
Showing posts with label Planning. Show all posts
Monday, 20 February 2012
Progress Report
Today was our first lesson back after our half-term break in which we were all present. Today we began to look at the evaluation questions and criteria for our blog, not only this but we also started the final stages of editing our thriller opening in which we now believe is 95% complete. As a group we found today very productive and hope to have finished our opening and have got well into our evaluations by the end of the week. We will be sure to post any further progress accordingly.

Tuesday, 7 February 2012
Tutorials That We Found Useful
As a group we decided to watch a few Final Cut tutorials to gain a better insight into the technology of the software and how it works as to try and gain the most out of it when it comes to editing our footage. These are some of the tutorials we found useful:
We will continue to look at tutorials like these throughout the editing of our opening to help us get the most out of our footage.
Tuesday, 31 January 2012
Detailed Shot List
Close up of a girls feet on what seems to be of a train track, the audience assumes from this that the person is in a dangerous situation involving possibilities of themselves in a life trading position.
Camera then moves onto a long shot behind the girl showing her balancing on the edge of the rails as well as her laughing, this is used to give the audience a different impression that she's free instead of her being in danger. Followed by a medium shot of her playing with the leaves around her.
There is then a series of binocular/POV shots in which the audience is given the impression that somebody is watching the girl from above as well as implying dominance and power over her.
Camera then returns to the girl playing with with sticks and smiling to herself when a figure appears (not yet showing them) this is used to bring tension and mystery into the mix in the audience's prespective.
After the conversation the man takes the girl by the wrist which is shown using a close up shot to again show dominance the man has against the girl.
(New scene) There is then a jump cut where the camera follows behind the man taking the girl into a shed or warehouse.
Medium shot of the girl speaking to the man which then jumps to behind the man replying to her again not showing his face to continue the suspense in thinking who he is and what he looks like exactly.
A Medium shot is used to show the man shutting the door of the warehouse/shed in where the girl is being kept as well as a close up shot of him locking the door which tells the audience in a way that the girl is being kept against her will and the male character is seeming to be of an un average person.
The last scene or shot is taken back to the train track area where the girl has left a message made out of sticks hoping someone passing by might try and help her which shows that she is in a difficult and desperate situation.
Film Timing Schedule
For Sunday the 5th of February.
11:00 - Leave and head to filming location.
11:30 - Will and Harry arrive at the filming location.
11:45 - Start setting up to film.
12:00 - Film scene we need on the tracks
13:00 - Have a break to discuss what we have achieved so far and talk about what we still need to do.
13:30 - Finish filming the scenes on the track with the close up on the ending shot of the message.
13:45 - Walk to second film location.
14:00 - Film on the second location.
14:40 - Review what we have achieved and see if there is anything else we need to do.
15:00 - Finish filming if everything is filmed.
This is our timed guideline of what we want to achieve on the day of filming, we have done this in order to make sure we get as much footage as we can possibly get and to make the most of our time filming.
11:00 - Leave and head to filming location.
11:30 - Will and Harry arrive at the filming location.
11:45 - Start setting up to film.
12:00 - Film scene we need on the tracks
13:00 - Have a break to discuss what we have achieved so far and talk about what we still need to do.
13:30 - Finish filming the scenes on the track with the close up on the ending shot of the message.
13:45 - Walk to second film location.
14:00 - Film on the second location.
14:40 - Review what we have achieved and see if there is anything else we need to do.
15:00 - Finish filming if everything is filmed.
This is our timed guideline of what we want to achieve on the day of filming, we have done this in order to make sure we get as much footage as we can possibly get and to make the most of our time filming.
Maps of Location
Here is the map of our intended location and the one to the far bottom shows the map including the deserted barn.

Black circle - the train track location.
Blue circle - where we start.
Red circle - the cricket club.
Yellow line - route.

Green circle - the deserted barn.
Transport Update
On the 5th of February Harry and Will will be traveling down to Coopersale as they are getting a lift from, Harry's mum. We will then be able to walk to both our locations easily from Rubie's house. Once we have finished filming Rubie will drive us to the station so we can get the train home.
Deserted Barn Photos


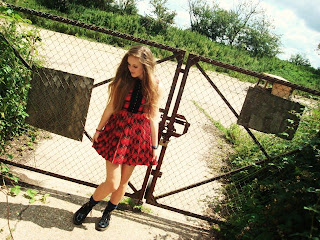
These are a few pictures I found from a while ago of the outside of the barn and one birds eye view of it from google maps. Here you can see the padlock and the gates. This would fit in with the use of gates and padlock mentioned in past props and storyline posts.
Risk Assessment Final Update
Once again after we had to change our location for our opening we decided that our risk assessment need updating so creating another one was necessary.
Location - Deserted Train Tracks
Risk - Tripping over loose rocks or logs.
What we can do to reduce the risk - Check the area in which we plan to film for any loose rocks on logs and remove any if spotted, not only this but we can have someone always on standby with a mobile phone in case of an Emergency
Location - Deserted Train Tracks
Risk - Tripping over loose rocks or logs.
What we can do to reduce the risk - Check the area in which we plan to film for any loose rocks on logs and remove any if spotted, not only this but we can have someone always on standby with a mobile phone in case of an Emergency
Location - Travelling to and from Deserted Train Tracks
Risk - Being run over or involved in accident.
What we can do to reduce the risk - Be careful when crossing roads or walking along pathways, drive responsibly and always have someone on standby with a mobile phone in case of an emergency.
Risk - Being run over or involved in accident.
What we can do to reduce the risk - Be careful when crossing roads or walking along pathways, drive responsibly and always have someone on standby with a mobile phone in case of an emergency.
Location - Coopersale Cricket Club
Risk - Tripping over rubbish or anything loose on the ground as well as possible slippery surface (if raining/snowing).
What we can do to reduce the risk - Make sure there are no trip hazards within the vincity of where we intend to film, always have someone on standby with a mobile phone in case of an emergency.
Location - Travelling to and from Coopersale Cricket Club
Risk - Tripping over rubbish or anything loose on the ground as well as possible slippery surface (if raining/snowing) and being run over or involved in accident.
What we can do to reduce the risk - Make sure there are no trip hazards within the vincity of where we intend to film, always have someone on standby with a mobile phone in case of an emergency and Be careful when crossing roads or walking along pathways, drive responsibly.
New Location Photos


As I hadn't been to this field in a while I didn't realise that the old plain black and white club now looked like this however we are still going to see if our scene will work using this as the doors are still black and the graffiti may actually be effective within our thriller. If not I have found a back up location which is a deserted barn with gates at the front of it that have padlocks which will help to create the desired effect we are looking for within our thriller opening.
New Location Update
Following on from our last updated location post we have since had to change that location to one that is closer and more plausible to get to. As the locations are now less than a 10 minute walk away from each other the continuity will be a lot more realistic. The weather changes will also be less drastic and it will be a lot more efficient to film all of our footage in one day at one area.
 Above is our new location, the Coopersale Cricket Club. It will be great to film as it looks old and somewhat unused which will fit the criteria for or opening perfectly. However there is a strong possibility that we might not be able to go inside, although we are going to see if we can get permission to enter the building as this is what we did originally plan to do in our storyboard. However we also have another location in which we could also use close to the cricket club a deserted barn which would also fit perfectly with our storyboard and storyline as well new props such as a gate and padlock as mentioned in a previous post. Below is a birds eye view of the deserted barn from google maps and a picture of it's iconic gates.

Monday, 30 January 2012
Filming Update
We originally planned to film today however the little girl we wanted to use in our opening was unfortunately unavailable today as she was ill, and didn't leave us with much notice to reschedule or find someone else to film that day. Therefore we think we will be filming all of our footage on Sunday the 5th of February as everyone will be available.
Monday, 23 January 2012
Transistions
The use of transitions will have an important impact on how effective our opening is, and especially during the credits.
Fade in/out
A fade is usually when an image gradually fades/turns to a single colour or when a picture appears gradually onto the screen. They're most common at the beginning and at the end of films.
Dissolve
 The dissolve is similar to the fade but instead of transitioning from a shot to a single colour. They can be used to make a link between two different objects. The dissolve is basically when a shot changes gradually into another shot.
 Lens Flare
Lens flare is commonly used to deliberately add a sense of drama to an image or clip. It also adds a sense of realism which will be useful when we want to get the audience to relate to our opening film clip. The lens flare implies that it is a original, un-edited image of a real lie scene.
Wipe
A wipe transition is when one shot replaces another, going from one side of the frame to the other. The shape of the wipe can be done in different shapes. This is the least effective of these transitions as it could come across as tacky even though it is a unique style of doing things it wouldn't be suitable for our opening as it isn't the style we are intending to do.
Fade in/out
A fade is usually when an image gradually fades/turns to a single colour or when a picture appears gradually onto the screen. They're most common at the beginning and at the end of films.
Dissolve


Lens flare is commonly used to deliberately add a sense of drama to an image or clip. It also adds a sense of realism which will be useful when we want to get the audience to relate to our opening film clip. The lens flare implies that it is a original, un-edited image of a real lie scene.
Wipe
A wipe transition is when one shot replaces another, going from one side of the frame to the other. The shape of the wipe can be done in different shapes. This is the least effective of these transitions as it could come across as tacky even though it is a unique style of doing things it wouldn't be suitable for our opening as it isn't the style we are intending to do.
Garage Band Software Consideration Music And Audio

Software Being Used And Considered
 Final cut is a professional video editing software available exclusively on Apple's Computers which we are going to use. Final Cut allows us to edit our videos that have been imported from our present video camera to the software from then on we can organise and put together our clips the way we want them to be shown. Additional features include video effects and audio effects which are highly relevant in making a high quality opening scene, we can also experiment with different styles and options best suited to the video as well as our audience that the application provides. However being more professional also means we have to spend more time editing the film so we must take this into consideration in planning out our time for doing this.
 iMovie however is a very basic and limited filming editing software also exclusive for Apple's Computers which we are going to use. Video clips from our camera can be imported onto the applications as well. The interesting thing about iMovie is that after editing your video on the software we can then import that document into Final cut and then adding more towards it. We should then take into consideration using both of these softwares when going through editing our piece of filming work.
Motion is again a exclusive software for Apple's computers to produce professional effects for video clips making it perfect for our use. Motion has built in templates as well as being editable for us to alter to meet our needs, this makes it suitable for creating opening title credits for our film production or film titles. Motion is also compatible when transferring saved documents/projects to Final cut which is the main software we are going to edit and organize our opening film in.
Booking Out Equipment
We have booked out the camera and equipment we plan to use after finalising the two dates we have chosen and intend to film. The picture below confirms that camera one is in our care for the following days.

Equipment Being Used In Our Opening
iMac - The apple computer has specially made software for the device such as iMovie and Final cut which is exclusive for it allowing our group to be able to edit and organise our selected and wanted clips from our school video camera to the computer making it look more professional and believable towards our audiences. We also have past experience when using Apple's computers which won't affect us instead if we had to take more time to understand the functions of it.
Panasonic HDC-SD9 - This video camera is compatible with the iMacs when transferring the video clips over as well as being able to edit them on the software that we have chosen to use which makes the product suitable for out purpose. The camera also has a battery life that can last up to an hour which is just right for the small amount of filming we have to produce due to us being away from a charger because we will be filming outside mainly it won't hopefully affect us when filming if it shuts down.
Tripod - The tripod we are going to be using is fully compatible with the video camera that we are also going to use. This allows us to produce steady camera shots when filming therefore making our opening film more professional looking. Its also is portable allowing us to easily transport it to one location to the another (Epping to Saffron Walden.)
Panasonic HDC-SD9 - This video camera is compatible with the iMacs when transferring the video clips over as well as being able to edit them on the software that we have chosen to use which makes the product suitable for out purpose. The camera also has a battery life that can last up to an hour which is just right for the small amount of filming we have to produce due to us being away from a charger because we will be filming outside mainly it won't hopefully affect us when filming if it shuts down.
Tripod - The tripod we are going to be using is fully compatible with the video camera that we are also going to use. This allows us to produce steady camera shots when filming therefore making our opening film more professional looking. Its also is portable allowing us to easily transport it to one location to the another (Epping to Saffron Walden.)
Eqiupment We Plan To Use
We decided to make a post identifying the equipment we plan to use when filming and editing as this would be a useful piece of information look back on an evaluate at a later stage.
Panasonic HDC-SD9

We plan to use this panasonic hand-held camera when we actually film our thriller opening. Reasons for choosing this particular camera are mainly because it the only camera of this quality that is available for us to use. The quality of this camera is good because it can shoot HD (High Definition) footage which will help us a great deal when it comes to not only filming our thriller opening but also when we come to edit our opening, this camera will help with the presentation of our work and make it look far more professional. Another reasons include, it's functionality and it's simplicity to use and operate. We also plan to use a tripod with this camera when filming our opening to give a steady hand and improve the quality of our shots. It's portability is also an great asset.
 We plan to use this when it comes to actually editing our opening. This is again is mainly because the iMac is available for us to use to edit our thriller opening. This is really beneficial to us as the iMac's we plan to use have Final Cut Express pre-installed which is a high quality piece of software we can use to edit our thriller opening making it effective and progressional which is what our audience expects. We also use the iMacs to do a lot of blog work such as posts like this one.
Overall we believe these two pieces of equipment will have a significant impact on the quality and professionalism within our opening. They will also help our thriller opening become more effective and successful which is what we are looking for and so are our audience.
Panasonic HDC-SD9

We plan to use this panasonic hand-held camera when we actually film our thriller opening. Reasons for choosing this particular camera are mainly because it the only camera of this quality that is available for us to use. The quality of this camera is good because it can shoot HD (High Definition) footage which will help us a great deal when it comes to not only filming our thriller opening but also when we come to edit our opening, this camera will help with the presentation of our work and make it look far more professional. Another reasons include, it's functionality and it's simplicity to use and operate. We also plan to use a tripod with this camera when filming our opening to give a steady hand and improve the quality of our shots. It's portability is also an great asset.
Apple iMac

Overall we believe these two pieces of equipment will have a significant impact on the quality and professionalism within our opening. They will also help our thriller opening become more effective and successful which is what we are looking for and so are our audience.
Sunday, 22 January 2012
Transportation
It is important to know how we are to going to get to and from our desired filming locations safely. As a result of this we have organised for Rubies mum to take us to Saffron Walden on the January 30th when we intend to film the warehouse/cellar scene. She will then take us back to school after we have finished filming.
Film Schedule
It is important for us as a group to plan when and where we need to be filming so that we can organise ourselves in a way that will see us arrive, film, leave efficiently and successfully.
As a group we have decided that we will be filming the cellar/warehouse scene after school on Monday 30th January between 4pm-7pm
As a group we have decided that we will be filming the cellar/warehouse scene after school on Monday 30th January between 4pm-7pm
Weather Report
We believe it is important to take into account the predictions for the weather forecast for the days we plan on filming. One of the days we originally were planning to film on it was forecast to rain so therefore we all decided on the filming date of Monday the 30th of January as it is suitable weather wise for filming our opening.


The second day we want to film is the 5th of February 2012, we have also looked at the predicted forecast for this.

Subscribe to:
Posts (Atom)